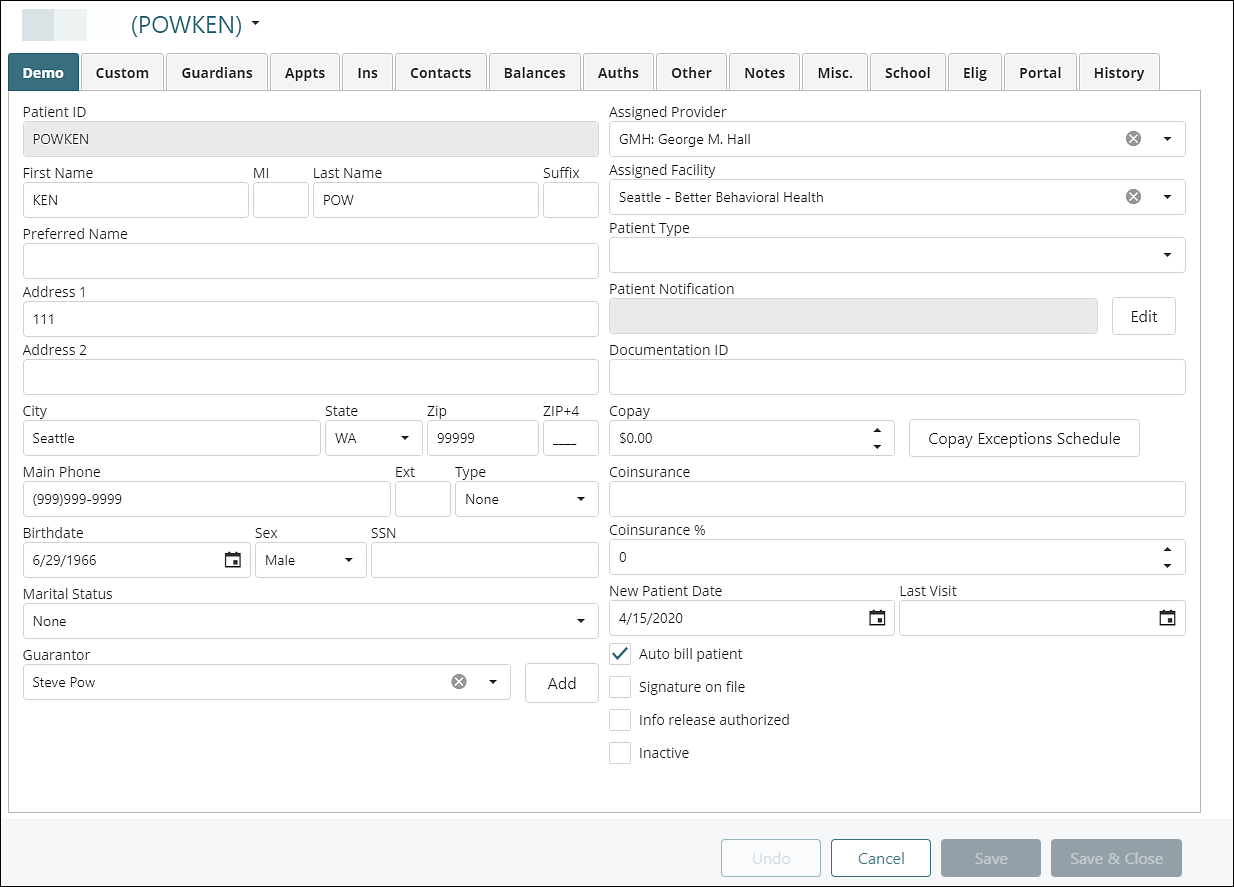
To access the Demographic tab click Persons & Institutions | Patients. Select a Patient and their Demographics tab will appear.

Documentation ID: this text field automatically appears next to the Patient ID in Mobile Notes. This text field allows for the inclusion of custom patient information like a Medicaid ID.
Copay: the out-of-pocket expense that is the patient's responsibility.
Coinsurance: the percentage that the patient pays after the insurance deductible has been met or exceeded.
New Patient Date: the date that the patient was first seen. The field will default to today's date, but the calendar can be used to back date the New Patient Date if necessary.
Last Visit: the date that the patient was last seen.
Auto Bill Patient: this checkbox specifies that the patient is responsible for payment in case the deductible has not been met or an item is not covered by insurance.
Signature on File: this checkbox indicates that the insurance company is authorized to pay the clinic directly.
Info Release Authorized: this checkbox indicates that the patient has signed paperwork authorizing the clinic to release their PHI to the insurance company.
Inactive: this checkbox determines whether the patient is active or inactive in the EMR. This does not delete the patient. It merely removes the patient from the search results.
Patient ID: this is an auto generated field and therefore it is greyed out. The Patient ID will consist of the first three letters of the patient's last name and the first three letters of the patient's first name.
Guarantor: the Guarantor is the person that is responsible for payment. This field can be left blank if patients themselves are the Guarantors. The options available in this drop-down can be created by clicking Persons & Institutions | Guarantors. Although this is not a free text field, typing the name of the guarantor will assist in the search process
Assigned Provider: the Provider that is assigned to the patient.
Assigned Facility: the primary Facility where the patient is most commonly seen.
Patient Type: the Patient Type is used to group patients together by demographics (Example: Adult, Adolescent, etc.). The options that are available in this drop-down box are created by clicking Reference Data | Patient Types
Patient Notification: this drop-down box selects the pop-up notification that appears when the patient is selected. The options that are available in this drop-down box are created by clicking Reference Data | Patient Notifications. Example: Do Not Schedule - History of No Show. Although this is not a free text field, typing the name of the notification will assist in the search process.
